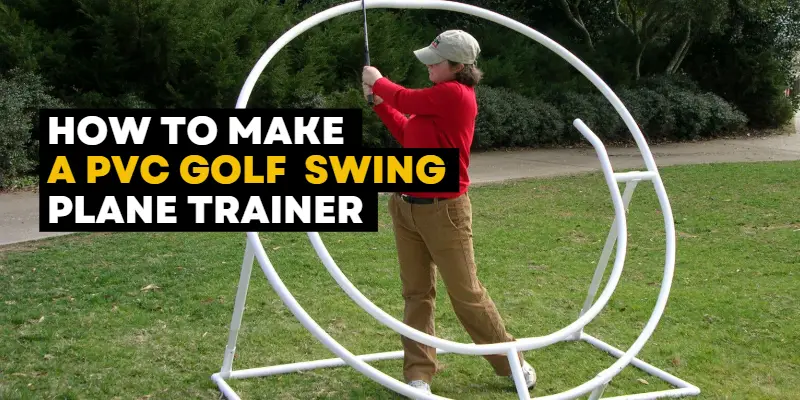
How To Make A PVC Golf Swing Plane Trainer – Complete Guide
Are you looking to improve your golf swing? A PVC golf swing plane trainer might just be the solution you need! This DIY project is easy-to-make and budget-friendly, providing a great way to work on your technique without breaking the bank.
Create a PVC golf swing plane trainer by cutting and assembling PVC pipes with connectors, adding foam padding for club protection.
Use the trainer for swing drills, focusing on correct positioning and safety. Improve your golf swing mechanics and elevate your game with this homemade training aid.
In this step-by-step guide, we’ll show you how to make a PVC golf swing plane trainer that will help you perfect your swing and lower your score on the green! So grab some materials and let’s get started!
How To Make A Pvc Golf Swing Plane Trainer – Step By Step Guide
Making your own PVC golf swing plane trainer is an affordable and easy way to improve your golf game. Here’s a step-by-step guide on how to make one at home.
By following these simple steps and adding personalized touches along the way, you can create a custom-made golf swing plane trainer perfect for improving your skills without breaking the bank!
Step One: Gathering Materials
Before beginning to build your PVC golf swing plane trainer, you will need to gather all of the necessary materials. Here is a list of what you will need:

- PVC pipes (1-inch diameter)
- PVC elbow joints
- PVC T-joints
- Measuring tape
- Saw or pipe cutter
- Sandpaper
Once you have gathered all of the necessary materials, it’s time to start building! First, measure and cut the PVC pipes into the desired lengths using a saw or pipe cutter. It’s important to ensure that each piece is cut accurately as this will affect how well your swing trainer works.
After cutting the pieces, use sandpaper to smooth out any rough edges that may cause injury while assembling them. Safety should always be a top priority when working with tools and equipment.
Now that you have prepared all of your materials for assembly, it’s on to step two – constructing the base of your golf swing plane trainer!
Step Two: Measuring and Cutting PVC Pipe
Now that you have gathered all the necessary materials for your golf swing plane trainer, it’s time to move forward with the building process. The second step involves measuring and cutting the PVC pipes to specific lengths.
- The first thing you need to do is determine the appropriate length of each pipe based on your height and arm length.
- To get accurate measurements, stand in a comfortable address position as if you were about to hit a golf ball while holding a club.
- Using a measuring tape or ruler, take note of how far off the ground your hands are from where they would be when gripping an actual club. This measurement will serve as your reference point for determining how long each pipe should be.
- Next, use a saw or any other cutting tool suitable for PVC pipes to cut them according to their designated lengths.
- Make sure that you make clean cuts while ensuring that there are no rough edges left behind.
Remember that precision is key in this step because even slight variations can affect the effectiveness of your golf swing plane trainer later on. So take extra care when making these cuts!
With Step Two completed successfully, we’re now ready to move onto Step Three which involves assembling and fitting all of our PVC pieces together!
Step Three: Cutting and Assembling the PVC Pipes
Now that you have all your materials ready, it’s time to start cutting and assembling the PVC pipes.
- Take one of the 4-foot pieces of pipe and cut it into four 1-foot sections using a saw. These will be used as legs for the trainer.
- Next, take one of the 3-foot pieces of pipe and cut it in half so that you have two equal pieces. These will be used as support beams for your swing plane trainer.
- Then, take one elbow joint connector and attach it to each end of both support beams. This will create an L-shape structure when connected with the legs later on.
- Now, take two T-joints connectors and attach them at both ends of each leg section. Make sure they are positioned correctly so that they can slide in between the L-shaped structures formed by the support beams.
- Slide each leg section into place between the T-joint connectors on both sides until they fit securely into place.
With Step Three complete, your PVC golf swing plane trainer is starting to come together! Next up is Step Four where we’ll add some finishing touches to make sure everything is secure before testing out our new training aid on the green!
Step Four: Assemble the Trainer
Now that you have all your pieces cut and ready, it’s time to start assembling your PVC golf swing plane trainer.
- Begin by inserting the four 90-degree elbow joints onto the two 18-inch pipes, so they form a rectangle with one long and one short side.
- Next, insert a T-joint at each corner of the rectangle. Make sure to face them inwards as this is where you will attach the arms of the trainer later on.
- Take your remaining two 36-inch pipes and fix one into each end of a T-joint placed at opposite corners. These will be used as support legs for your trainer.
- Take four more T-joints and connect them to both sides of each arm of the rectangular frame. Then insert an additional length of PVC pipe into these joints until they are flush with its other ends.
Your PVC golf swing plane trainer is now complete! You can adjust it to fit different club sizes or customize it further based on your needs. Happy swinging!
Safety Considerations
When it comes to making your own PVC golf swing plane trainer, safety should be a top priority. Here are some important safety considerations to keep in mind during the construction process.
- First and foremost, always wear proper protective gear such as gloves and eye protection when working with PVC pipes and power tools. This will help prevent injury from cuts or debris.
- Next, make sure you have a stable work surface that is clear of any tripping hazards or clutter. A sturdy workbench or table is ideal for this project.
- When cutting the PVC pipes, use caution to avoid accidentally cutting yourself or others nearby. Always cut away from your body using a saw specifically designed for plastic materials.
- Additionally, never force a pipe into an elbow joint if it doesn’t fit easily. You could risk damaging the pipe or causing it to become unstable during use.
- Before testing out your finished product on the golf course, ensure that all connections are secure and there are no sharp edges that could cause harm while swinging.
By following these safety considerations throughout the construction process of your PVC golf swing plane trainer, you can enjoy practicing your swing without worrying about unnecessary risks.
Conclusion
A PVC golf swing plane trainer is an affordable and effective tool for improving your golf game. By following the steps in this guide, you can easily create your own trainer.
Remember to prioritize safety when handling PVC pipes and always test the stability of the device. With consistent use, this trainer can help improve your swing path, leading to better ball striking and lower scores on the course. Try it out and experience the difference!
FAQs:
How do you make a golf pressure board?
To make a golf pressure board, attach grip tape to a sturdy board and place pressure-sensitive sensors strategically. Connect the sensors to a display for real-time feedback. Use the board to practice proper pressure distribution in your swing, improving mechanics and overall performance.
How can I improve my golf swing plane?
To improve your golf swing plane:
- Focus on setup, alignment, and grip.
- Practice a smooth and on-plane swing.
- Seek professional guidance and practice regularly.
How do you set up a plane swing?
To set up a plane swing:
- Align your body parallel to the target line.
- Maintain a comfortable grip and square clubface.
- Position the ball in line with your front foot.
- Practice a balanced and relaxed posture.
How do you visualize a swing plane?
To visualize a swing plane:
- Imagine an inclined plane for your swing.
- Picture your club following that plane during the swing.
- Use practice drills and videos to reinforce the image.
- Develop a sense of the proper club movement along the swing plane.
Is my swing plane too flat?
Assessing whether your swing plane is too flat requires a professional evaluation. Consult a golf instructor who can analyze your swing mechanics and provide personalized feedback for improvement.


Regarding the PVC pipe swing plane trainer, the instructions seem incomplete. What kind of pipe did you use for the rounded sections of the trainer? Is that flexible, smooth, pvc? Where do you find that and what is it called? Also, there is no mention of cutting the connectors so the golf club does not hit them.
For the PVC pipe swing plane trainer, the rounded sections utilize flexible and smooth PVC pipe. It’s commonly referred to as flexible PVC or PVC conduit. You can find it at hardware stores or home improvement centers.
As for cutting the connectors to prevent the golf club from hitting them, the instructions might be incomplete. It’s advisable to use a saw or PVC cutter to trim the connectors, ensuring a smoother swing experience without interference.
Adjusting the length carefully will enhance the effectiveness of the trainer while addressing any potential issues with the golf club striking the connectors.